Advocate Management System Source Code + Documentation
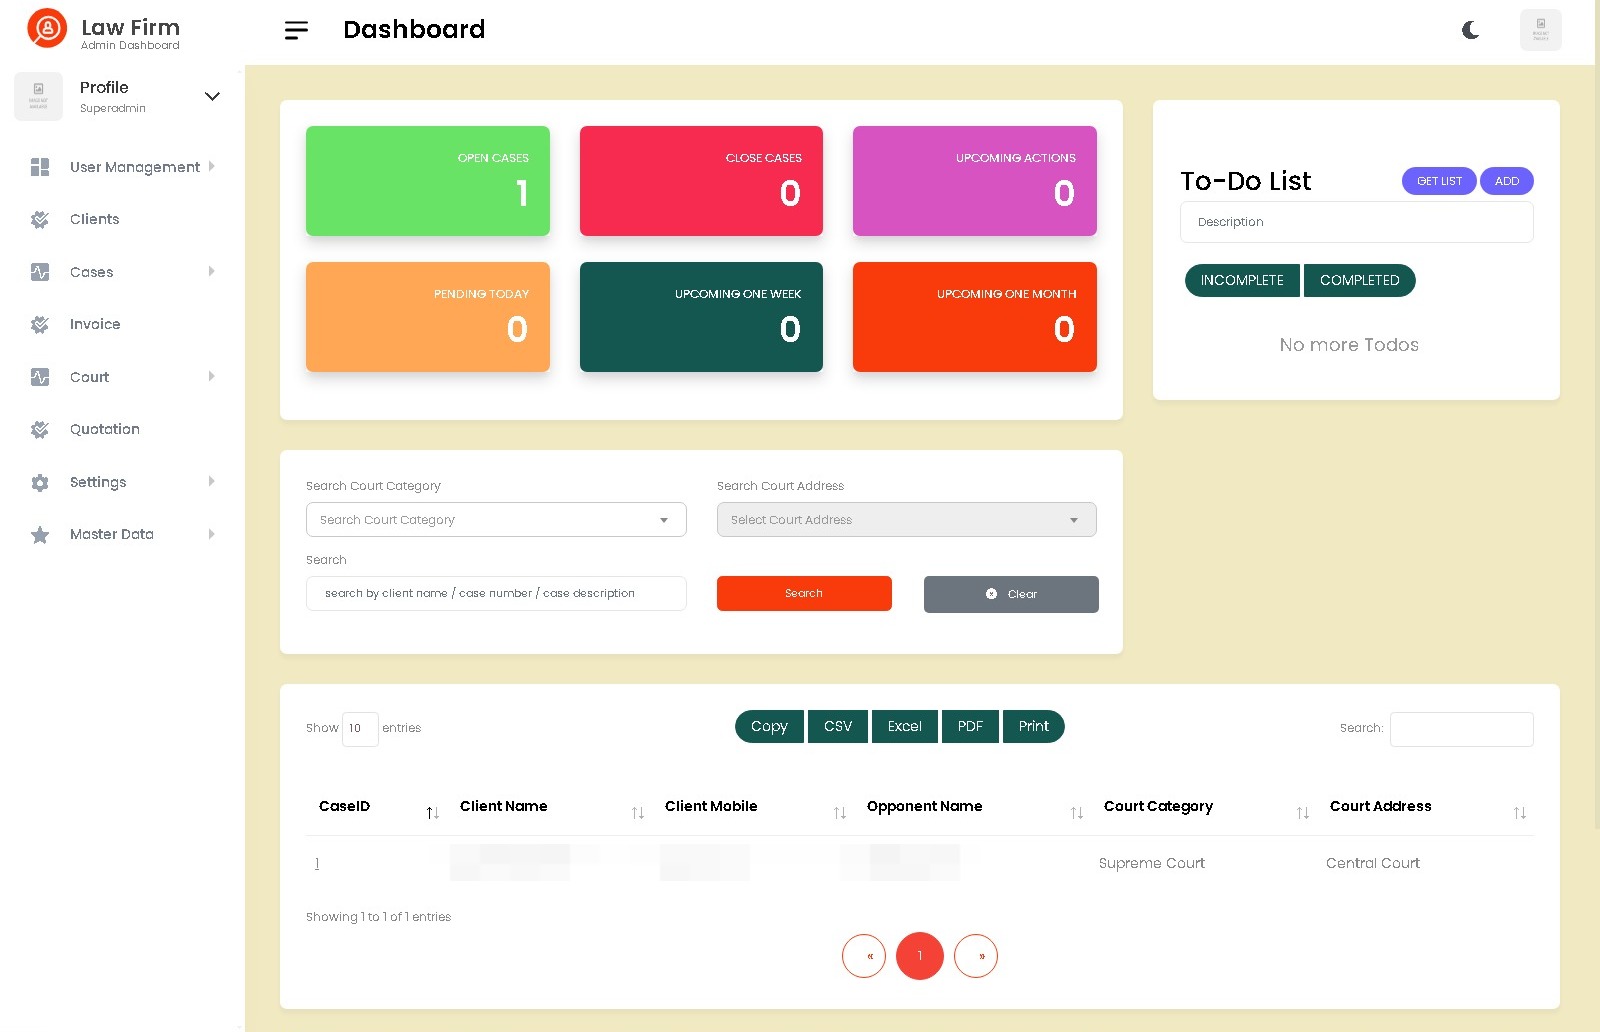
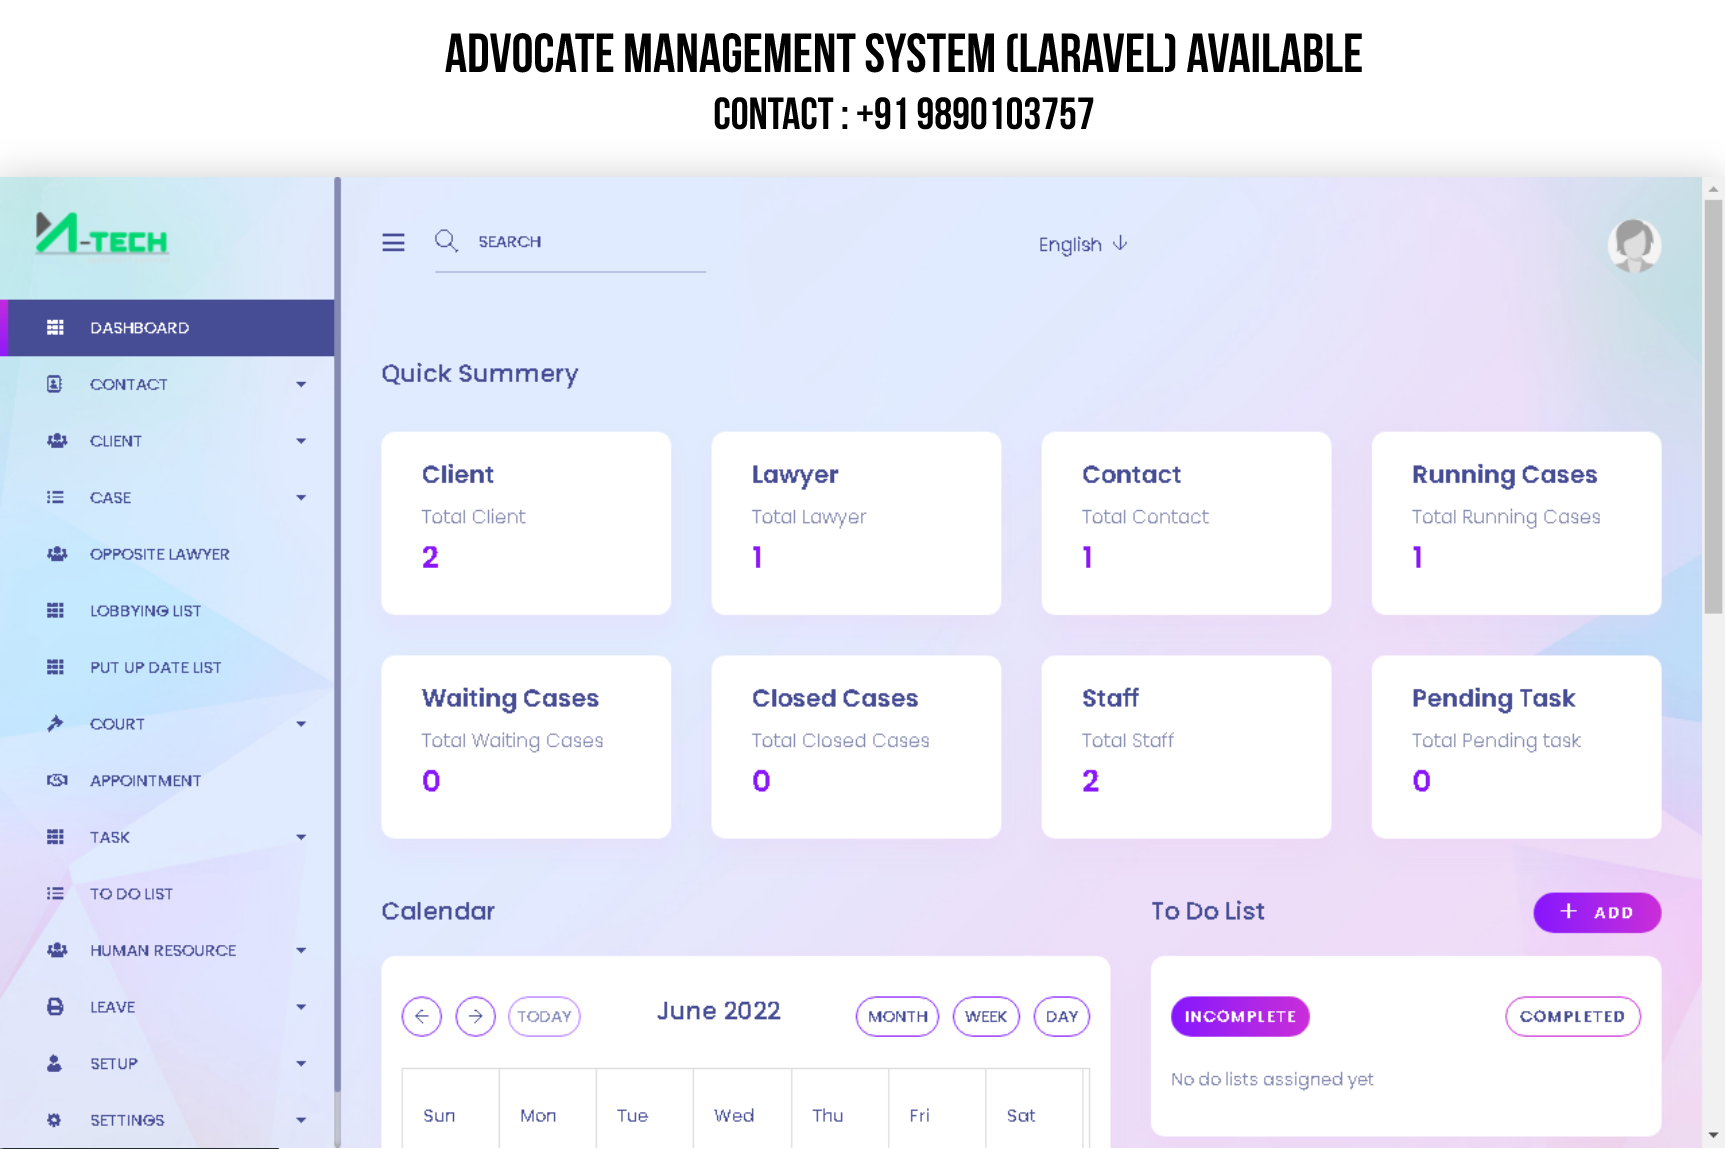
1. Dashboard
At the top menu of left sidebar is Dashboard. There are several view port in dashboard. we can see the number of case, Court and contact etc. at a glance. After login a user can see the update for that day.
2. & 3. & 4. & 5. & 6. & 7.
From those section we can khow about number of Client, Lawyer, Contact, Rumming case, Closed Case.
8. Search
Search with any keyword, if it match any section of application it will show in dropdown.
9. Language
M-Tech delivered to you equiped with diffrent languages : English, Arabic (RTL), French, Dutch, German, Hindi, Italian, Turkish,Russian, Spanish & Portuguse etc. You can also add laguage with your own customization.
10. Profile
The user can see their profile, change their existing password. Logout button at the bottom of this profile section.
11. Calendar
This section show a full calendar. It also show the registered event.
12. Todo List
This is a todo list manager. We can add task in list.There are two button one is complete another is incomplete. To see complete and incomplete list we show toggle them.
13. Appointment
Here we can see latest registered appointment which are registered from Appointment section.
11. Upcomming Date
This section show the Upcomming Hearing date.
Contact
Contact List
1. Contact List
After click this option we can see this contact list page.
2. New Contact
For add new contact to list, we should click this button.
3. Quick Search
For searching something form this list we should write the keyword here.
4. Export the list
There are several option(Copy, CSV, xls, print and pdf) to export the list data. The last option for manage column visuality.
5. Action
Form this section we can manipulate and view list data.We can Edit Delete and show the list data.
Add Contact
Add new Contact
1. Create Button
For add new contact, after fill the form we should click the create button.
Contact Category
Contact Category
1. Contact Category List
After click this option we can see this contact list page.
2. New Contact Category
For add new contact category to list, we should click this button.
3. Quick Search
For searching something form this list we should write the keyword here.
4. Export the list
There are several option(Copy, CSV, xls, print and pdf) to export the list data. The last option for manage column visuality.
5. Action
Form this section we can manipulate and view list data.We can Edit Delete and show the list data.
Add Contact Category
Add new Contact Category
1. Create Button
For add new contact category, after fill the form we should click the create button.
Client
Client List
1. Client List
After click this option we can see this client list page.
2. New Client
For add new client to list, we should click this button.
3. Quick Search
For searching something form this list we should write the keyword here.
4. Export the list
There are several option(Copy, CSV, xls, print and pdf) to export the list data. The last option for manage column visuality.
5. Action
Form this section we can manipulate and view list data.We can Edit Delete and show the list data.
Add Client
Add new Client
1. Create Button
For add new client, after fill the form we should click the create button.
Client Category
client Category
1. Client Category List
After click this option we can see this client list page.
2. New Client Category
For add new client category to list, we should click this button.
3. Quick Search
For searching something form this list we should write the keyword here.
4. Export the list
There are several option(Copy, CSV, xls, print and pdf) to export the list data. The last option for manage column visuality.
5. Action
Form this section we can manipulate and view list data.We can Edit Delete and show the list data.
Add Contact Category
Add new Contact Category
1. Create Button
For add new contact category, after fill the form we should click the create button.
Case
Causelist
1. Cause list
After click this option we can see this client list page.
2. Date
Put a specific date here. It will return all cases which hearing date is matched with that date.
3. Get List
For searching and show result click here.
All Case List
All Case
1. Case List
After click this option we can see this case list page.
2. New Case
For add new case to list, we should click this button.
3. Quick Search
For searching something form this list we should write the keyword here.
4. Export the list
There are several option(Copy, CSV, xls, print and pdf) to export the list data. The last option for manage column visuality.
5. Action
Form this section we can manipulate and view list data.We can Edit Delete and show the list data.
6. New Date
For add new hearing date for this case Click here.
7. New Put Up Date
For add new put up date for this case Click here.
8. New Lobbying Date
For add new lobbying date for this case Click here.
9. New Judgement Date
For add new Judgement date for this case Click here.
Case Details
This is a case details view.
1. New Date
For add new hearing date for this case Click here.
2. New Put Up Date
For add new put up date for this case Click here.
3. New Lobbying Date
For add new lobbying date for this case Click here.
4. New Judgement Date
For add new Judgement date for this case Click here.
5. Print
Click this button for print this page content.
6. Hearing Date Action
For Edit and Delete date.
Add New Case
1. Add New Case
After click this option we can see this client list page.
2. Create Button
For add new contact category, after fill the form we should click the create button.
Case Category
1. Case Category List
After click this option we can see this client list page.
2. New Case Category
For add new Case Category to list, we should click this button.
3. Quick Search
For searching something form this list we should write the keyword here.
4. Export the list
There are several option(Copy, CSV, xls, print and pdf) to export the list data. The last option for manage column visuality.
5. Action
Form this section we can manipulate and view list data.We can Edit Delete and show the list data.
Judgement Case
1. Judgement Case List
After click this option we can see this client list page.
2. Quick Search
For searching something form this list we should write the keyword here.
3. Export the list
There are several option(Copy, CSV, xls, print and pdf) to export the list data. The last option for manage column visuality.
4. Action
Form this section we can manipulate and view list data.We can Edit Delete and show the list data.
5. Re-open Case
For Re open a case and add a date and description click here.
6. Closed Case
For close a case and add a date and description click here.
Closed Case
1. Closed Case List
After click this option we can see this client list page.
2. Quick Search
For searching something form this list we should write the keyword here.
3. Export the list
There are several option(Copy, CSV, xls, print and pdf) to export the list data. The last option for manage column visuality.
4. Action
Form this section we can manipulate and view list data.We can Edit Delete and show the list data.
Opposite Lawyer
1. Opposit Lawyer List
After click this option we can see this client list page.
2. New Opposit Lawyer
For add new Opposit Lawyer to list, we should click this button.
3. Quick Search
For searching something form this list we should write the keyword here.
4. Export the list
There are several option(Copy, CSV, xls, print and pdf) to export the list data. The last option for manage column visuality.
5. Action
Form this section we can manipulate and view list data.We can Edit Delete and show the list data.
Add Opposit Lawyer
1. Create Button
For add Opposit Lawyer, after fill the form we should click the create button.
Lobbying List
1. Lobbying list
After click this option we can see this Lobbying list page.
2. Date
Put a specific date here. It will return all cases which lobbying date is matched with that date.
3. Get List
For searching and show result click here.
Put Up Date List
Put Up Date List
1. Put Up Date list
After click this option we can see this Put Up Date list page.
2. Date
Put a specific date here. It will return all cases which Put Up Date date is matched with that date.
3. Get List
For searching and show result click here.
Court
Court List
1. Court List
After click this option we can see this Court list page.
2. New Court
For add new Court to list, we should click this button.
3. Quick Search
For searching something form this list we should write the keyword here.
4. Export the list
There are several option(Copy, CSV, xls, print and pdf) to export the list data. The last option for manage column visuality.
5. Action
Form this section we can manipulate and view list data.We can Edit Delete and show the list data.
Add Court
Add new Court
1. Create Button
For add new Court, after fill the form we should click the create button.
Court Category
Court Category
1. Court Category List
After click this option we can see this Court list page.
2. New Court Category
For add new Court category to list, we should click this button.
3. Quick Search
For searching something form this list we should write the keyword here.
4. Export the list
There are several option(Copy, CSV, xls, print and pdf) to export the list data. The last option for manage column visuality.
5. Action
Form this section we can manipulate and view list data.We can Edit Delete and show the list data.
Add Contact Category
Add new Contact Category
1. Create Button
For add new contact category, after fill the form we should click the create button.
Appointment
1. Appointment List
After click this option we can see this Court list page.
2. New Appointment
For add new Appointment to list, we should click this button.
3. Quick Search
For searching something form this list we should write the keyword here.
4. Export the list
There are several option(Copy, CSV, xls, print and pdf) to export the list data. The last option for manage column visuality.
5. Action
Form this section we can manipulate and view list data.We can Edit Delete and show the list data.
Add Appointment
Add New Appointment
1. Create Button
For add new appointment, after fill the form we should click the create button.
Task
Task List
1. Task List
After click this option we can see this Task list page.
2. New Task
For add new Task to list, we should click this button.
3. Quick Search
For searching something form this list we should write the keyword here.
4. Export the list
There are several option(Copy, CSV, xls, print and pdf) to export the list data. The last option for manage column visuality.
5. Action
Form this section we can manipulate and view list data.We can Edit Delete and show the list data.
6. Mark as complete
Click here for mark as complete this task.After click it will add completed list.
Add Task
Add new Task
1. Create Button
For add new Task, after fill the form we should click the create button.
My Task
My Task
1. My Task
After click this option we can see this My Task page. This page only show those task which are assignd for current user.
2. Quick Search
For searching something form this list we should write the keyword here.
3. Export the list
There are several option(Copy, CSV, xls, print and pdf) to export the list data. The last option for manage column visuality.
4. Action
Form this section we can manipulate and view list data.We can Edit Delete and show the list data.
5. Mark as complete
Click here for mark as complete this task.After click it will add completed list.
Complete Task
Complete Task
1. Complete Task
After click this option we can see this Complete Task page. This page only show those task which are mark as complete.
2. Quick Search
For searching something form this list we should write the keyword here.
3. Export the list
There are several option(Copy, CSV, xls, print and pdf) to export the list data. The last option for manage column visuality.
4. Action
Form this section we can manipulate and view list data.We can Edit Delete and show the list data.
Todo
To Do
1. Todo List
After click this option we can see this Todo list page.
2. Incomplete
To see incomplete todo click on this button.
3. Complete
To see complete todo click on this button.
4. Add
For Add new todo click on this button.
5. Mark as complete
For mark as complete click here.
Add Todo
Add New Todo
1. Save Button
For add new todo, after fill the form we should click the save button.
Staff
Staff List
1. Staff
After click this option we can see this Staff list page.
2. New Staff
For add new Staff to list, we should click this button.
3. Quick Search
For searching something form this list we should write the keyword here.
4. Export the list
There are several option(Copy, CSV, xls, print and pdf) to export the list data. The last option for manage column visuality.
5. Action
Form this section we can manipulate and view list data.We can Edit Delete and show the list data.
Add new staff
1. Create Button
For add new staff, after fill the form we should click the create button.
Role
1. Role
After click this option we can see this Role list page.
2. New Role
For add new Role, after fill role name we should click this save button.
3. Action
Form this section we can manipulate and view list data.We can Edit Delete and show the list data.
4. Assigne Permission
For assign permission to a specific role, need to click here.
Permission
After click Assignee Permission it will show this page.
1. Submit Button
After assign permission as you need for this role you show click submit button for update data.
Attendance
1. Attendance
After click this option we can see this Attendance page.
2. Select Date
Select the spacific date which date attendance information you want to update.
3. Select Role
Select the spacific role which role attendance information you want to update.
After select role you can see this view.
1. Add note
Add Attendance status and note(Optional).
2. Save Button
For save attendance information you should click here.
Attendance Report
1. Attendance Report
After click this option we can see this Attendance report page.
2. Select Role
Select the spacific role which role attendance information you want to update.
3. Select Month
Select the spacific Month which Month attendance information you want to update.
4. Select Year
Select the spacific Year which Year attendance information you want to update.
5. Search
For get list after selct all field click the seach button.
Payroll
1. Payroll Report
After click this option we can see this Payroll report page.
2. Select Role
Select the spacific role which role Payroll information you want to update.
3. Select Month
Select the spacific Month which Month Payroll information you want to update.
4. Select Year
Select the spacific Year which Year Payroll information you want to update.
5. Search
h3>
For get list after selct all field click the seach button. Then it will show the all staff payroll under this role.
5. Generate Payroll
For Generate payroll You should click here.
Leave Type
1. Leave Type
After click this option we can see this leave type list page.
2. New Leave Type
For add new Leave type to list, we should click this button.
3. Quick Search
For searching something form this list we should write the keyword here.
4. Export the list
There are several option(Copy, CSV, xls, print and pdf) to export the list data. The last option for manage column visuality.
5. Action
Form this section we can manipulate and view list data.We can Edit Delete and show the list data.
Leave Define
1. Leave Define
After click this option we can see this Leave Define list page.
2. New Leave Define
For add new Leave Define to list, we should click this button.
3. Quick Search
For searching something form this list we should write the keyword here.
4. Export the list
There are several option(Copy, CSV, xls, print and pdf) to export the list data. The last option for manage column visuality.
5. Action
Form this section we can manipulate and view list data.We can Edit Delete and show the list data.
Approve Leave Request
Approve Leave Request
1. Approve Leave Request List
After click this option we can see this client list page.
2. Quick Search
For searching something form this list we should write the keyword here.
3. Export the list
There are several option(Copy, CSV, xls, print and pdf) to export the list data. The last option for manage column visuality.
4. Action
Form this section we can manipulate and view list data.We can Edit Delete and show the list data.
Pending Leave
1. Pending Leave List
After click this option we can see this client list page.
2. Quick Search
For searching something form this list we should write the keyword here.
3. Export the list
There are several option(Copy, CSV, xls, print and pdf) to export the list data. The last option for manage column visuality.
4. Action
Form this section we can manipulate and view list data.We can Edit Delete and show the list data.
After click view we will see below modal.
1. Select Option
Select Leave Status form here.
Apply Leave
Apply Leave
1. Apply Leave
After click this option we can see this client list page.
2. Leave Request
For apply leave request you should click here. Here open a form and you should fill up and submit.
Carry Forward
1. Carry Forward
After click this option we can see this Leave Carry Forward list page.
2. Generate Carry Forward
For add Generate Carry Forward to list, we should click this button.
3. Quick Search
For searching something form this list we should write the keyword here.
4. Export the list
There are several option(Copy, CSV, xls, print and pdf) to export the list data. The last option for manage column visuality.
5. Action
For add Carry Forward to user you should toggle it.
Case Stage
Case Stage List
1. Case Stage
After click this option we can see this Case Stage list page.
2. New Case Stage
For add new Case Stage to list, we should click this button.
3. Quick Search
For searching something form this list we should write the keyword here.
4. Export the list
There are several option(Copy, CSV, xls, print and pdf) to export the list data. The last option for manage column visuality.
5. Action
Form this section we can manipulate and view list data.We can Edit Delete and show the list data.
Add Case Stage
1. Create Button
For add new Case Stage, after fill the form we should click the create button.
Act
1. Act List
After click this option we can see this act list page.
2. New Act
For add new Act to list, we should click this button.
3. Quick Search
For searching something form this list we should write the keyword here.
4. Export the list
There are several option(Copy, CSV, xls, print and pdf) to export the list data. The last option for manage column visuality.
5. Action
Form this section we can manipulate and view list data.We can Edit Delete and show the list data.
Add Act
1. Create Button
For add new act, after fill the form we should click the create button.
Setting
General Setting
2. General Setting(Default view in setting)
Here we can update setting for our system.
3. Upload Logo
Here we can upload logo for our sysem.
4. Upload favicon
Here we can upload favicon for our sysem.
5. Save
After update information in form we should click save button save this information.
SMTP Setting
1. SMTP Setting
Here we can update SMTP and sendmail setting for our system mail.
2. Save
After update information in form we should click save button save this information.
3. Send Test Mail
Here we can send test mail from our system.
Login Background Setting
1. Login Background Setting
Here we can update Background image for login page.
2. Upload Image
Here we can upload an Background image for login page.
3. Save
After update information in form we should click save button save this information.
Email Tamplate
1. Email Tamplate
Here we can customize Email Tamplate for our system mail.
2. Subject
This is mail subject.
3. Status
If this active mail are send for this action otherwise none.
3. Save
After update information in form we should click save button save this information.
-----------------------------------------------------------------------------------------
Advocate Management System source code Available
Demo interested inbox
All code & software Included with Installation Guide ,Documentation.
☎ Follow this link to message me on WhatsApp: https://wa.me/message/Q3AW74KWVA7IC1
M-Tech Systems | Sinhgad Road, Pune - 411041
Ph: (M) +91 9890103757 | (D) +91 8956843757
Web: www.mtechsystems.co.in